How to Get Grok API Key (Step by Step Guide) | 2026
Grok, the competitor for ChatGPT, is one of the best and fastest LLM models available for users, and it is open source.
To use the full potential of the Grok in your programs and your day-to-day life activities, you need to create a Grok API key. This key will give you access to use all the features of the Grok API in your programs.
However, it is fairly complex to get the Grok API key, but you need not worry. To provide you with a simple way to access your Grok API key, we have created a step-by-step guide on how you can create and access your Grok API key. We also mention the Grok API costs, rate limits, common errors, and factors that may hold you back in the usage of the Grok API key, so make sure to stay till the end.
Let's get started.
Account Creation
The Grok API key is a unique code that unlocks access to Grok's features. Like a door key, it allows you to interact with Grok's functionalities. You'll need this key if you want to use Grok's services through a program. Although the creation process of the Grok API key is fairly complex, follow the guide below to get a clear understanding of how to create and use the Grok API key.
Here is how to create a Grok API Key
Step 1:Access the Grok PromptIDE
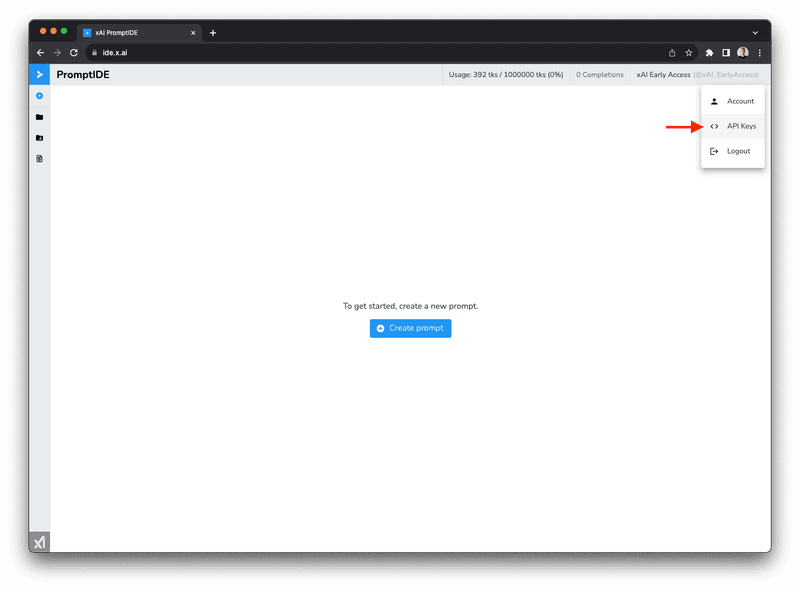
Head over to the Grok PromptIDE atide.x.ai and log in using your existing X account.
Step 2:Find Your API Keys:
Once logged in, click on your username displayed in the top right corner. From the dropdown menu, select "API Keys."

Step 3: Create a New API Key:
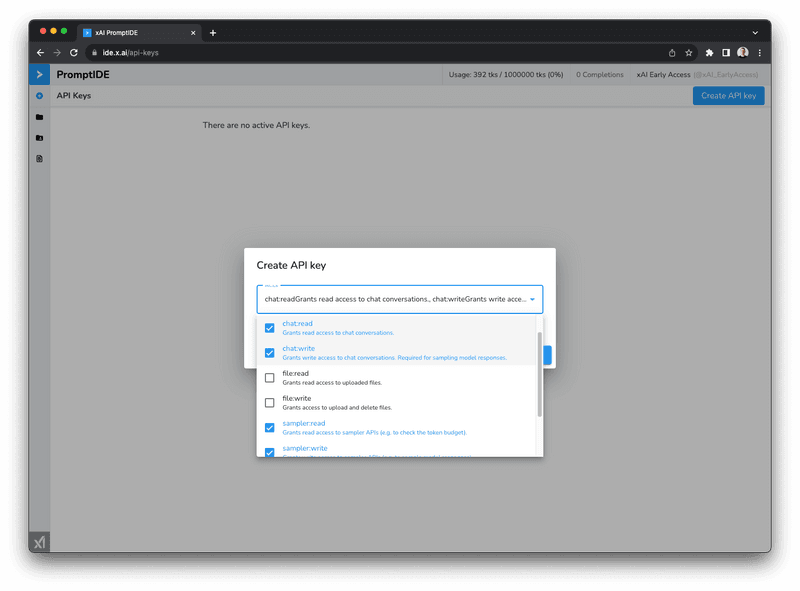
On the API Keys page, click the "Create API Key" button. This will open a window where you can customize permissions for your key.
Step 4: Set Permissions and Copy Your Key:
By default, no permissions are assigned. Choose the access level you need:
For full Grok access: Select the "chat:write" permission.
For raw Grok-1 model sampling: Choose "sampler:write" permission.
Important: Remember, these actions use your token limit, so choose wisely.

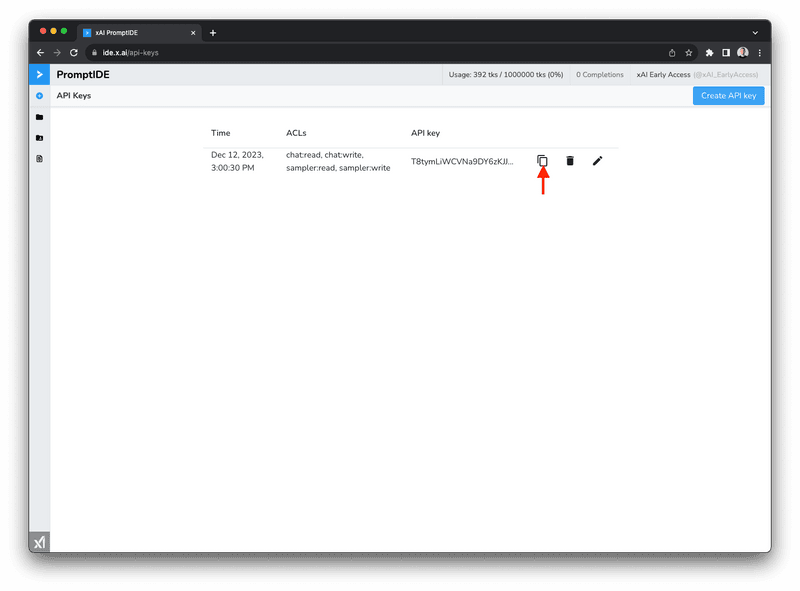
Step 5: After selecting the permission(s), click "Save." Your new API key will appear on the list. Click the "Copy" button to grab the key for later use.

That's it! You can now access and use the Grok API key, you can now use the full potential of Grok through their Python SDK.
Cost
As of now, there is no specific paid tier for the Grok API. You can use the Grok API and the usual Grok chat interface with X (formerly Twitter). With higher-paid plans, you get higher rate limits too. You can access the chat interface of Grok directly from the X platform and the Grok API through the Grok Python SDK. Here are the price details of the X premium, which can be used to access the Grok API keys.
X offers three subscription plans: Basic, Premium, and Premium+. Each plan has a different monthly and annual price. Here's a quick breakdown:
Basic: Starts at $3/month or $32/year.
Premium: Starts at $8/month or $84/year.
Premium+: Starts at $16/month or $168/year.
Upgrading and Downgrading:
Upgrading:
You'll receive a partial refund for the remaining time on your current plan (on iOS only).
Your new features will be available immediately (on all platforms).
You'll be charged for the new plan at the start of your next billing cycle.
Downgrading:
You'll keep your current plan and features until the end of your billing cycle (on all platforms).
You won't receive a refund for the remaining time on your current plan (unless required by law).
You'll be charged for the new plan at the start of your next billing cycle.
Key Differences Between Platforms:
iOS: Offers partial refunds for upgrades.
Web: Applies credit from your previous plan to future payments on upgrades.
Note:
Prices listed are starting points and may vary depending on your location.
Upgrading or downgrading on the same day won't affect your ad revenue share.
Rate Limits
Grok API uses rate limits to control how often you can access its features. These limits help manage server load and ensure a smooth experience for everyone. However, as of now, there are no stable rate limits for Grok API. In the coming days, the team is working on bringing paid tiers with stable API performance and increased rate limits. Also, information on how many API limits used can be visible only by going to your settings.
To know the current rate limits of the Grok API, you need to look into the headers. They will refer to the amount of rates you have used. Here is how each header refers to.
Header | Value | Notes |
retry-after | 2 | In seconds |
x-ratelimit-limit-requests | 14400 | Always refers to Requests Per Day (RPD) |
x-ratelimit-limit-tokens | 18000 | Always refers to Tokens Per Minute (TPM) |
x-ratelimit-remaining-requests | 14370 | Always refers to Requests Per Day (RPD) |
x-ratelimit-remaining-tokens | 17997 | Always refers to Tokens Per Minute (TPM) |
x-ratelimit-reset-requests | 2m59.56s | Always refers to Requests Per Day (RPD) |
x-ratelimit-reset-tokens | 7.66s | Always refers to Tokens Per Minute (TPM) |
Reaching the Limit: If you exceed the rate limit, you'll receive a 429 "Too Many Requests" error code. Don't worry, the headers will tell you how long to wait before trying again.
Elephas
If you want to take your Grok AI experience a step up, then use Elephas. With Elephas, you can use Grok and several other popular LLM models such as Open AI, Gemini, Claude, and even local LLMs to safeguard your information and run your chats locally.
Elephas is a powerful Mac AI assistant that can help you in your everyday tasks and reduce your work time by more than half. It can help you brainstorm ideas, write content, research, reply to emails in one click, and many more.
Also, you can use the power of popular LLM models such as Gemini, Claude, etc., to increase your experience with Elephas. Elephas is like the one productivity tool that needs to be on your MacBook if you want to increase your productivity and reduce your work time by half.
You can download the free version of Elephas now.
Common Errors
Grok helps you parse unstructured data like log files. While it's powerful, there can be errors during setup. Here's how to fix two common Grok API errors:
1. Missing XAI_API_KEY:
Error Message: "ValueError: Trying to read the xAI API key from the XAI_API_KEY environment variable but it doesn't exist."
Cause: You haven't set the XAI_API_KEY environment variable correctly.
Fix: Double-check that you followed the instructions for setting the environment variable. This usually involves adding XAI_API_KEY=your_api_key to your system's environment variables.
2. Missing Permissions (ACLS):
Error Message: "API key is missing ACLs required to perform this request."
Cause: Your API key doesn't have the necessary permissions to perform the action you're trying.
Fix: Go back to the platform where you created your API key (e.g., ide.x.ai) and edit the key to grant the required permissions.
Additional Tips:
Refer to the Grok documentation (if applicable) for specific error messages and troubleshooting steps.
Search online forums or communities for help with Grok errors.
Comments
Your comment has been submitted