How to Set Up Siri on Mac and iPhone (2026 Guide)
Setting up Siri in 2026 comes with a twist most guides skip: there are really two Siris right now. The one you can turn on today has a new look, Type to Siri, and an optional ChatGPT extension. The fully conversational, screen-aware Siri that Apple demoed is still rolling out in stages, with the fully rebuilt version expected around iOS 27.
One Reddit user in a thread about the delay put it plainly: “Sometimes I genuinely prefer old Siri. The new AI Siri sometimes gets things wildly wrong” (r/apple). This guide sets up the Siri you actually have today, on both your iPhone and your Mac, and keeps it private.
Quick answer: how to set up Siri
- Update first: iOS 26 / iPadOS 26 / macOS Tahoe 26, then check your is Siri an AI eligibility.
- iPhone/iPad: Settings > Apple Intelligence & Siri > turn on “Listen for Siri” and train your voice.
- Mac: System Settings > Apple Intelligence & Siri > toggle Siri on, pick a “Listen for” phrase.
- Optional: Turn on Apple Intelligence, the ChatGPT extension, and Type to Siri.
- Private by default: For work over your own notes and PDFs where Siri hits its limit, Elephas keeps data on your Mac. It has a free plan and starts at $19/month.
Prerequisites
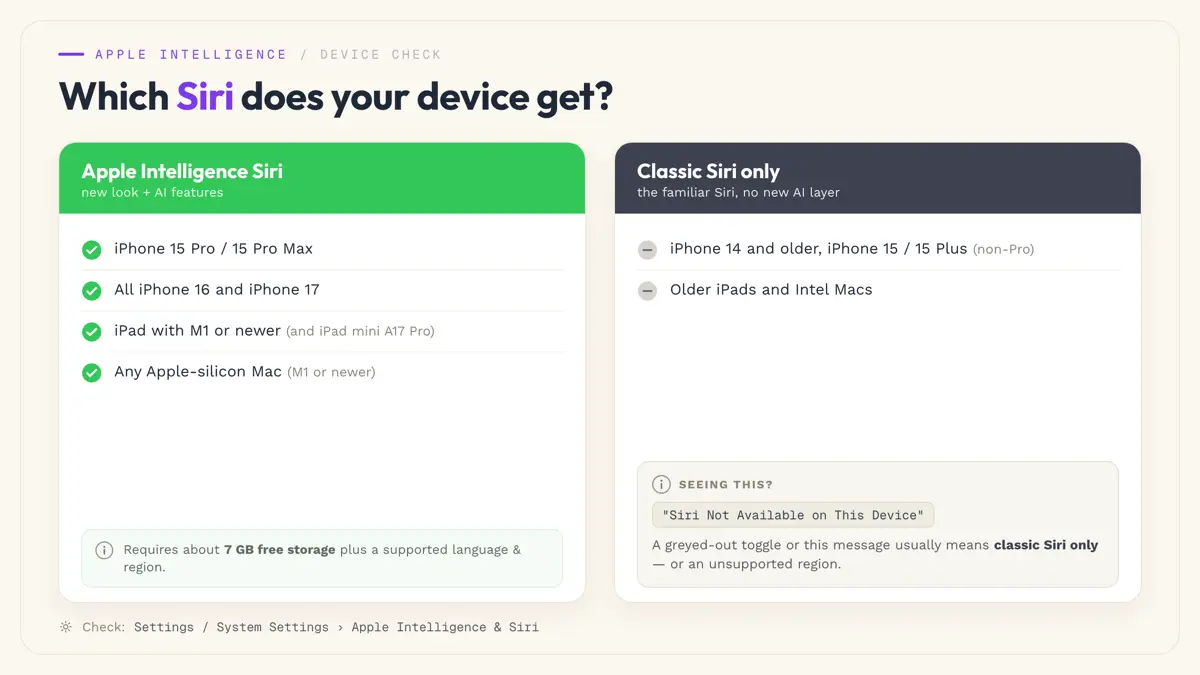
Before you begin, confirm your devices can run the Siri you expect. The redesigned Apple Intelligence Siri needs newer hardware, while classic Siri works on almost everything. As one r/Siri commenter put it, Siri with AI is limited to recent Macs, M1 or newer iPads, and last year's Pro iPhones.
| Requirement | What you need |
|---|---|
| Software | iOS 26 / iPadOS 26 / macOS Tahoe 26 (older OS runs classic Siri) |
| Apple Intelligence device (optional) | iPhone 15 Pro or any iPhone 16, M-series iPad, Apple-silicon Mac |
| Apple Account | Signed in, for cross-device Siri and sync |
| Connection | Siri needs an internet connection to work |
| Language and region | A supported language with a matching region |
| Time | About 8 to 12 minutes across both devices |
If you're setting this up from scratch
You do not need to install anything. Siri is built into your iPhone, iPad, and Mac. Sign in to your Apple Account, connect to Wi-Fi, and allow the microphone first. One catch for beginners: Apple Intelligence and Siri are separate, and the newer AI layer only appears on eligible devices.
If you're coming from another assistant
Moving from Alexa or Google Assistant? Your voice habits transfer, but your smart-home devices do not. Alexa-only or Google-only gear must be re-paired into Apple Home first, so look for a “Works with Apple Home” or Matter badge. Home Assistant users on Reddit lean on a Matter hub to bridge ecosystems (r/homeassistant).
If you're upgrading an existing Siri workflow
You already use Siri for timers and reminders. The setup choices worth your attention now are Apple Intelligence, the ChatGPT extension, and Type to Siri. Each one changes what leaves your device. The ChatGPT extension, in particular, adds a path to a cloud model, so decide whether you want a confirmation prompt every time.
How Do You Set Up Siri, Step by Step?
Work through these in order. The whole setup takes about 8 to 12 minutes across both devices, roughly 5 minutes on the iPhone and 3 to 4 minutes on the Mac. Each step names the exact path for both devices, which stay in sync through the same Apple Account, per Apple, plus a quick way to confirm it worked.
To set up Siri, update your software, turn Siri on in Settings on both devices, then add the optional features you want. Here is the full sequence:
- Update your software, then set a supported language and region.
- Turn on Siri on iPhone under Settings > Apple Intelligence & Siri.
- Turn on Siri on Mac under System Settings > Apple Intelligence & Siri.
- Set your Siri language and voice on each device.
- Turn on Apple Intelligence on eligible devices only.
- Set up the ChatGPT extension and keep Confirm ChatGPT Requests on.
- Turn on Type to Siri to send requests without speaking.
- Test Siri by voice and by button on both devices.
Step 1: Check eligibility, OS, and region
- Update the software. On iPhone or iPad go to Settings > General > Software Update. On Mac go to System Settings > General > Software Update.
- Set a supported language and matching region under Settings > General > Language & Region.
- Open Settings > Apple Intelligence & Siri (Mac: System Settings > Apple Intelligence & Siri).
Verify it worked: The Siri toggle is present and not greyed out. If you see “Siri Not Available on This Device” or no Apple Intelligence section, your model runs classic Siri only, or your region is not supported yet (Apple).
Step 2: Turn on Siri on iPhone and iPad
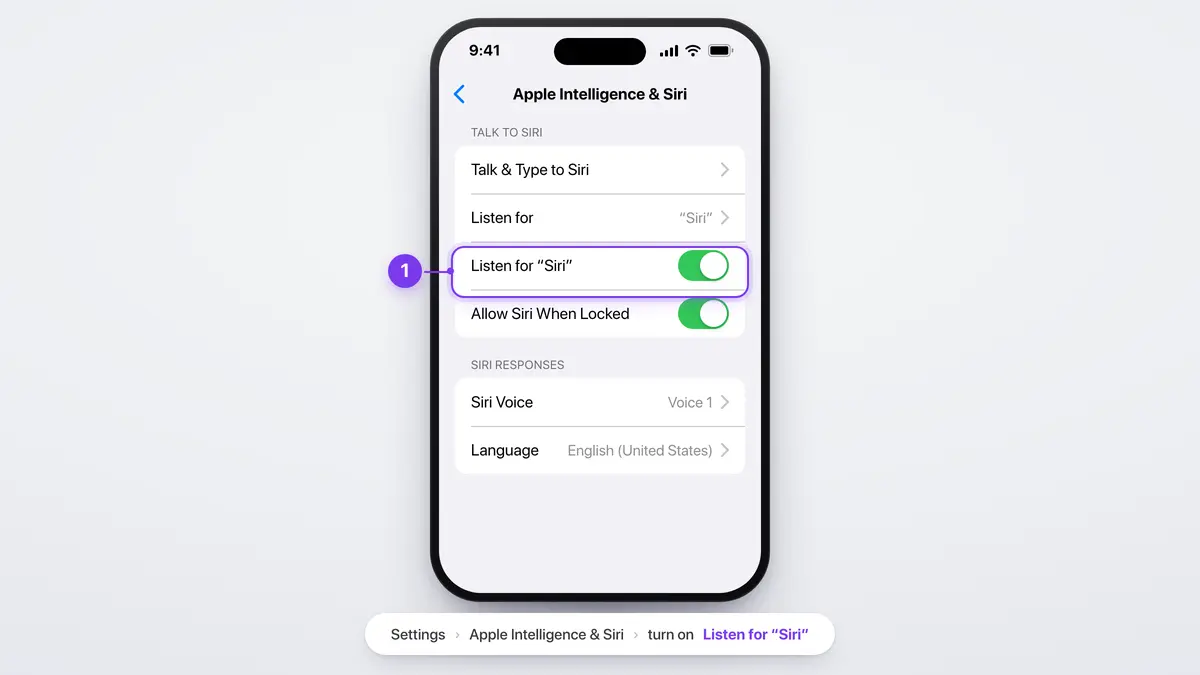
- Open Settings > Apple Intelligence & Siri. Older devices show “Siri” or “Siri & Search.”
- Tap Talk & Type to Siri (older devices show Talk to Siri), then turn on Listen for “Siri” (or “Hey Siri”) to enable voice activation.
- Follow the prompts to teach Siri your voice.
First-timers
Verify it worked: The Listen for “Siri” toggle is green, and saying “Siri” from a few feet away wakes the listening animation (Apple).
Step 3: Turn on Siri on Mac
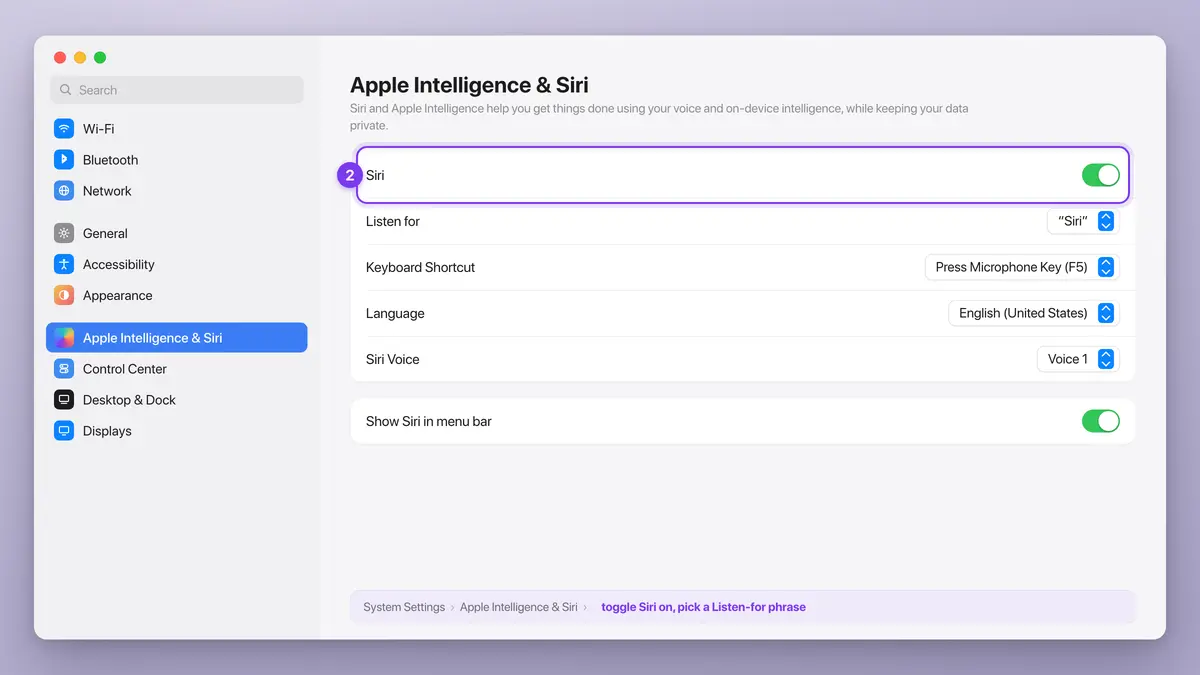
- Click the Apple menu, then System Settings.
- Click Apple Intelligence & Siri in the sidebar, toggle Siri on, and click Enable.
- Open the “Listen for” dropdown, choose “Siri” or “Hey Siri,” and train your voice. You can also set a keyboard shortcut.
Verify it worked: The Siri icon appears in the menu bar, and holding the shortcut or saying “Siri” opens the Siri window (Apple).
Step 4: Set the language and voice
- On iPhone or iPad, open Settings > Apple Intelligence & Siri > Language, then pick a Siri Voice.
- On Mac, use the Language dropdown and the Voice option in the same panel.
Verify it worked: Ask “What's the weather?” Siri should answer in your chosen language and voice.
Step 5: Turn on Apple Intelligence (eligible devices only)
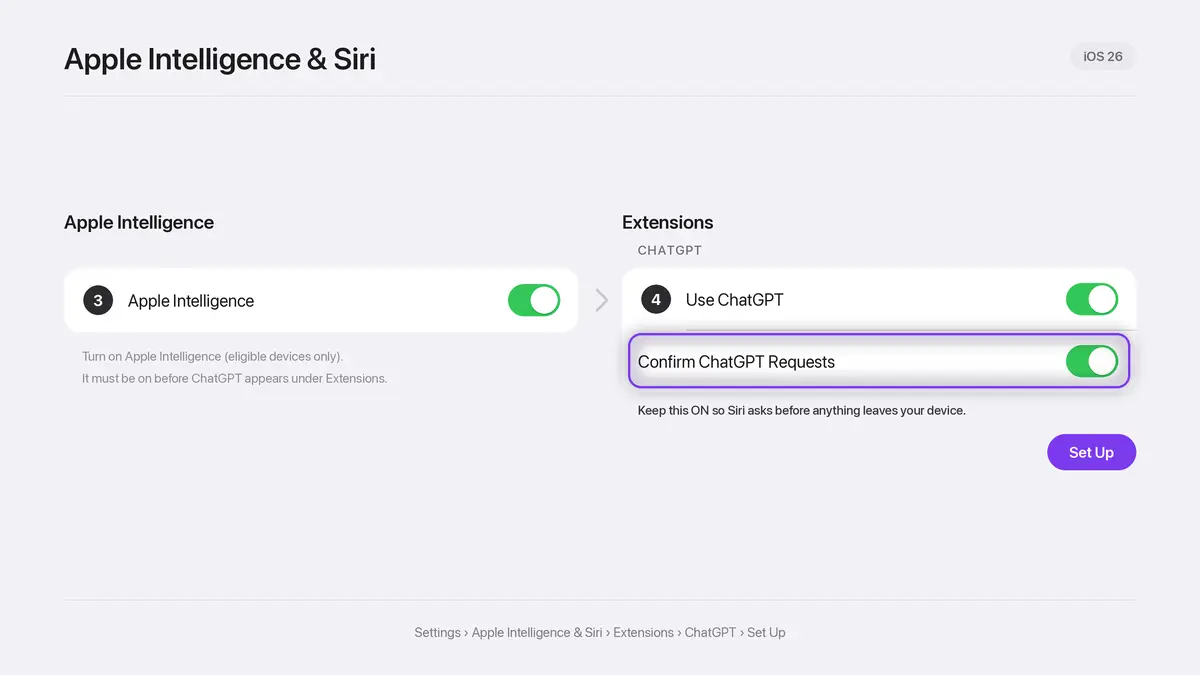
- On iPhone or iPad, tap Turn on Apple Intelligence in Settings > Apple Intelligence & Siri.
- On Mac, toggle Apple Intelligence on in the same panel. Features download in the background.
Set your expectations
Verify it worked: Siri shows the new glowing screen-edge design and an “Apple Intelligence is ready” state. On ineligible devices this option is simply absent, which is normal.
Step 6: Set up the ChatGPT extension and control the hand-off
- Go to Settings > Apple Intelligence & Siri > Extensions > ChatGPT > Set Up (same path on Mac).
- Choose Enable ChatGPT without an account, or use it with an account.
- Leave Confirm ChatGPT Requests on so Siri asks before sending anything.
Privacy note (recommended)
Power users
Verify it worked: Asking Siri something complex shows a “Use ChatGPT?” confirmation before the request leaves the device (Apple).
Step 7: Turn on Type to Siri
- With Apple Intelligence on, double-tap the bottom of the screen after invoking Siri to type instead of speak.
- Without Apple Intelligence, turn on the classic route: Settings > Accessibility > Siri > Type to Siri. On Mac, set the shortcut to type.
One r/iphone tip shows how handy this gets: “If you have Type to Siri turned on in the Apple Intelligence settings, when you want to download an app you can completely bypass the App Store by double” tapping (r/iphone).
Verify it worked: A text field appears when you invoke Siri, and typing a request returns an answer without speaking.
Step 8: Verify Siri works across Mac and iPhone
- On each device, wake Siri by voice and by the manual method (iPhone side button, Mac menu-bar icon or shortcut).
- Run one query per device, such as “Set a timer for 5 minutes.”
Verify it worked: Both devices wake, listen, and answer. Because you are signed into the same Apple Account, Siri behaves consistently. If a request stalls, note that some actions need the phone unlocked first, a limit users grumble about often (r/technology).
Activate Siri on Your Other Apple Devices
Siri is not just on your iPhone and Mac. Once you set it up, the same Apple Account carries the digital assistant to your iPad, Apple Watch, HomePod, AirPods, Apple TV, and CarPlay. You can activate Siri with your voice or a button, and each device has its own button, so it helps to know the press-and-hold method for each.
| Device | Say “Siri” | Button to activate Siri |
|---|---|---|
| iPhone | “Siri” or “Hey Siri” | Press and hold the side button (home button on older models) |
| iPad | “Siri” or “Hey Siri” | Press and hold the top button or home button |
| Apple Watch (Series 3 or later) | “Siri”, or raise your wrist and talk | Press and hold the Digital Crown |
| HomePod | “Siri” | Touch and hold the top |
| AirPods | “Siri” | Press and hold the stem |
| Apple TV | Ask Siri | Press and hold the Siri button on the remote |
| CarPlay | “Siri” | Press and hold the voice button on your steering wheel |
The button method stays consistent across the lineup. Press the side button for Siri on a modern iPhone, or press the home button for Siri on older models. Hold the home button on an iPad without Face ID, hold the Digital Crown on an Apple Watch Series 3 or later, and touch and hold the top of a HomePod. In a car, press and hold the voice button on your steering wheel if your vehicle supports CarPlay.
You can also tap Siri on screen instead. On iPhone, that button to activate Siri sits at the bottom of the screen, so you can activate Siri to ask questions without pressing a physical button or speaking a word.
- Turn on Allow Siri When Locked so you can make a request without unlocking first; Face ID still guards anything sensitive.
- Turn on Improve Siri and Dictation to help Siri respond to your voice, and choose how Siri replies, out loud or on screen.
- To skip talking, turn on Type to Siri and type your request with the keyboard instead of speaking.
- Set up Siri on each device once. After that it responds hands-free, and you can disable Siri or turn off Siri per device in the Settings app whenever you want.
Common Mistakes
Most setup failures trace to a handful of specific causes. Here are the ones people actually hit, with the fix for each.
- “Siri Not Available on This Device” or a greyed-out toggle (2026). The redesigned Siri needs an eligible device such as an iPhone 15 Pro, iPhone 16, or an M-series iPad or Mac. Older models run classic Siri only. Confirm eligibility on Apple's list, then set up standard Siri and skip Apple Intelligence. This one hits first-timers the most.
- “Hey Siri” never responds after setup (2026). Voice activation is off by default after device setup if you skipped the training screen. Go to Settings > Apple Intelligence & Siri > Talk & Type to Siri, turn on Listen for “Siri,” and retrain your voice (Apple 105037). Migrators coming from an always-listening Alexa see this most.
- Siri is on but hears nothing (2026). A thick case, a stick-on card wallet, or a cheap screen protector can cover the microphone. Remove it and clean the mic port. Also turn off Low Power Mode, which suspends the always-on listener until the device charges (Setapp, 2026).
- Language or region mismatch (2026). An unsupported language variant makes voice recognition fail silently, and it hides Apple Intelligence because that rollout is region-gated. Set a supported language and matching region under General > Language & Region, then re-check the Siri panel (Technobezz, 2026).
Two lighter Reddit examples show why verification matters: Siri hearing “call a plumber” as “Calling Paula” (r/apple), and a wrist timer that “spun for a full 30 seconds” before failing (r/AppleWatch). Most misfires are one of the four fixes above. For what Siri can access, see Siri privacy.
Next Steps
Siri is set up. What you do next depends on where you started.
If you're setting this up from scratch
Practice a few everyday requests: set a timer, add a reminder, ask for directions. Once those feel natural, explore Shortcuts to chain actions into one command. Keep the Confirm ChatGPT Requests prompt on until you know which requests you are comfortable sending off the device.
If you're coming from another assistant
Finish re-pairing your smart-home devices into Apple Home so Siri can control them. Then run a parity check: confirm Siri can do the five things you asked your old assistant most, and rebuild any missing routines as Shortcuts. Cross-device hand-offs still frustrate some owners (r/HomePod), so keep the same Apple Account on every device.
If you're upgrading an existing Siri workflow
Here is where setup meets a real limit. Siri, even with Apple Intelligence and the ChatGPT extension, is built for quick commands. It cannot privately reason over your own notes, PDFs, and long drafts, and the ChatGPT hand-off can send content off your device.
Independent research shows voice assistants are not risk-free. Researchers found a wake-word assistant can be triggered by inaudible ultrasonic commands in the DolphinAttack study, and another team showed the attack works from up to 110 meters away with laser light in the LightCommands study.
Apple's on-device design beats a cloud-first assistant, but it is not beyond audit. A 2026 audit found Apple's differential-privacy framework had violations in 5 of 9 mechanisms, affecting 87% of one release's data collection and 68% of another (research analysis). Reviewers also found Private Cloud Compute's closed builds hard to fully verify (2026 study).
Where a private assistant takes over
Privacy complaints about Siri are not academic. Apple agreed to a $95 million settlement over claims that Siri captured private conversations, a case users tracked on r/apple.
The stakes add up. IBM's 2025 report put the average data breach at $4.44 million globally, and a record $10.22 million in the US, per IBM, which is why professionals move sensitive work off shared clouds.
Elephas is a privacy-friendly AI knowledge assistant for Mac that keeps your files on the device and can use built-in local LLM models. Its users search their own information 50-70% faster and save 5 to 10 hours a week, per Elephas.
How Elephas protects a prompt before it reaches the cloud
For researchers and professionals who still want a leading cloud model, Elephas adds a second layer through automatic Smart Redaction. Before a prompt is sent to ChatGPT 5.5, Claude Opus 4.8, Gemini, or any other cloud model, Elephas strips sensitive names, emails, phone numbers, and identifiers on your Mac.
The cloud model only ever sees the sanitized text, and the redacted fields are reassembled locally so identifiable information never leaves the device. Elephas pairs this with zero data retention: content never trains AI models, never sits on a vendor's server, and never passes through a third-party reviewer's screen. Smart Redaction is available on every Elephas plan, including the Free tier.
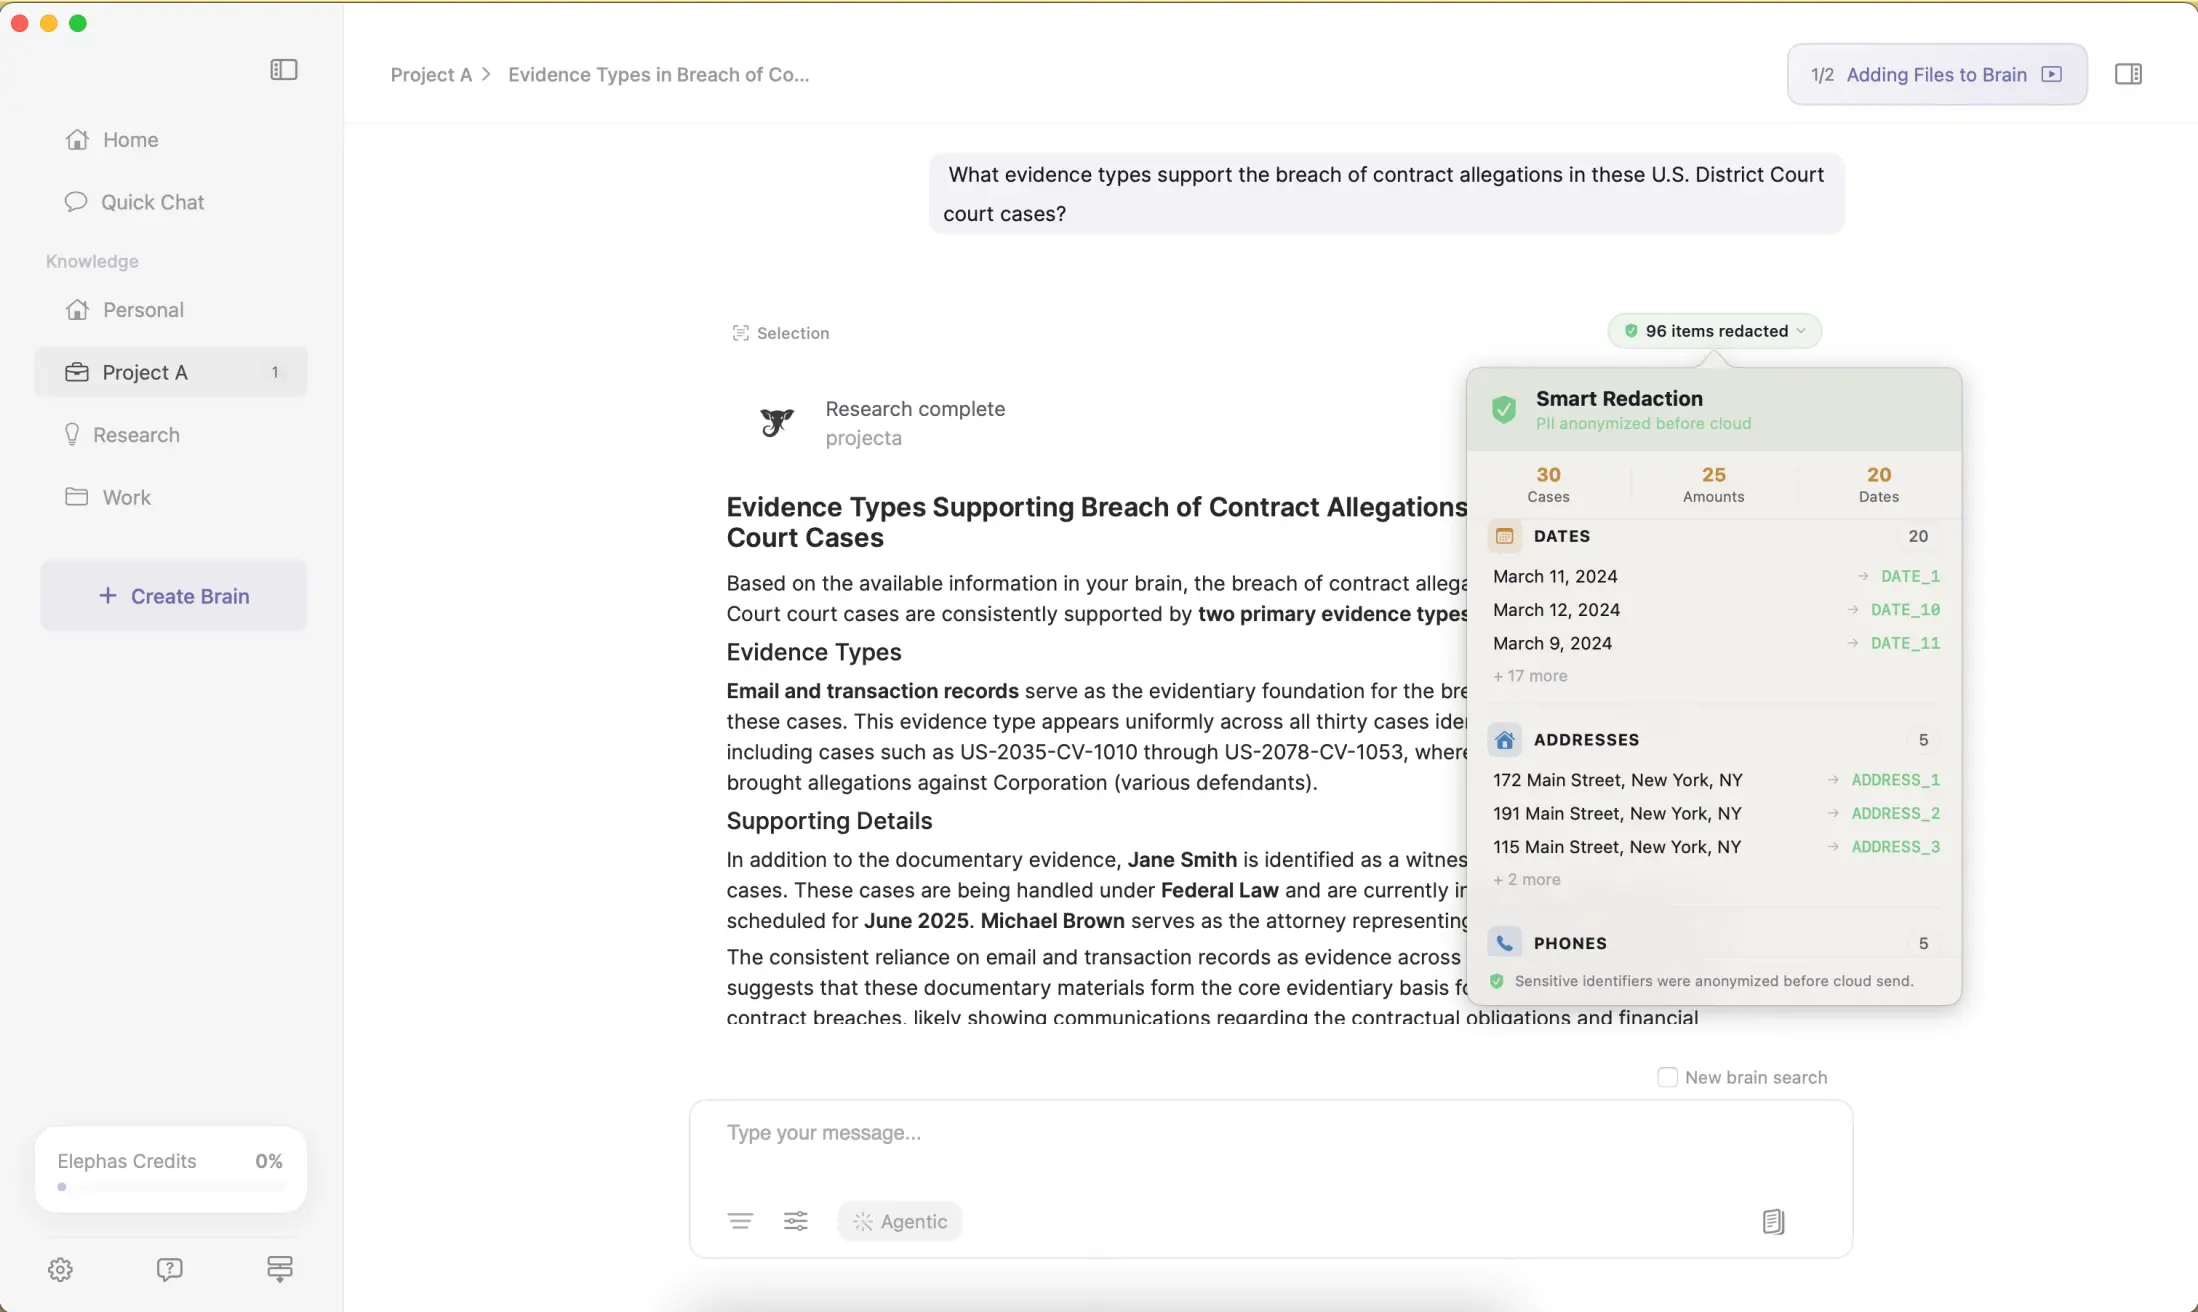
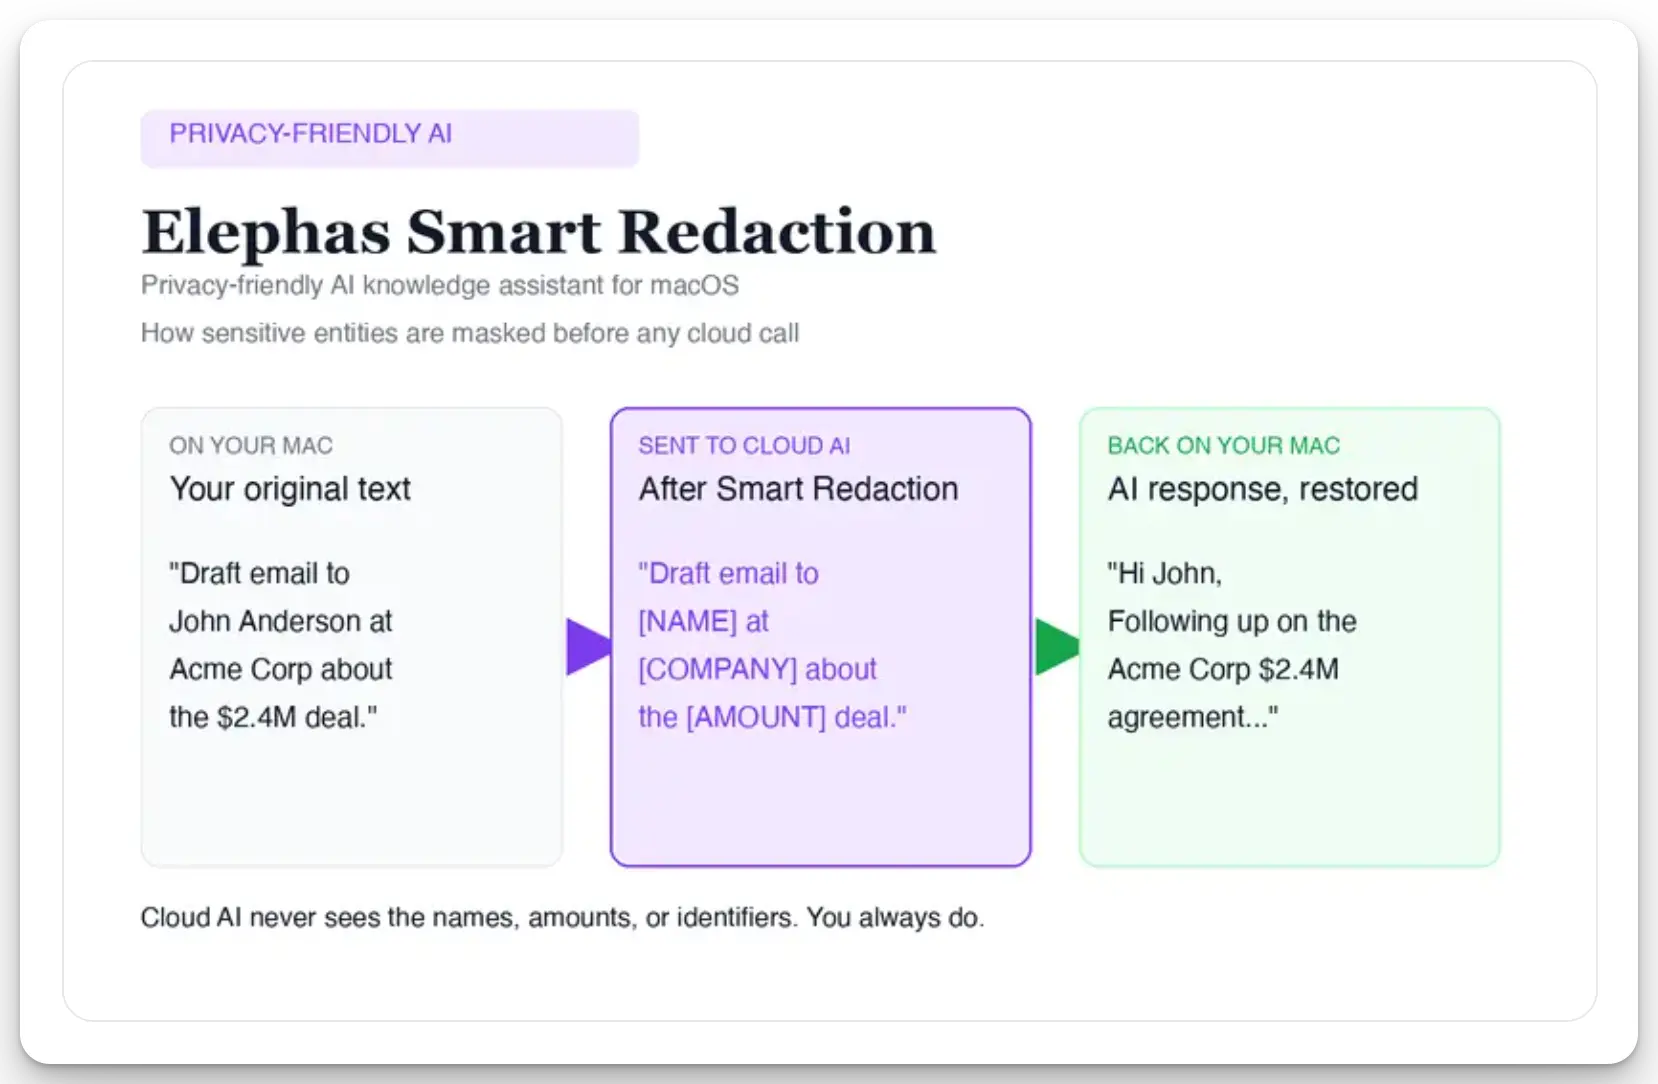
Sensitive data is automatically detected and redacted before anything reaches a cloud AI model, your content is never used to train AI models, and nothing passes through a third-party reviewer's screen.
Elephas has a free plan and starts at $19/month. If you are deciding between the assistants, Siri vs ChatGPT breaks down the confidential-work angle, and if the AI layer is not for you, here is how to turn off Apple Intelligence. The wider system Siri plugs into is mapped in our Apple Intelligence guide.
Frequently Asked Questions
How do I turn on Siri on my iPhone?
Open Settings > Apple Intelligence & Siri, tap Talk & Type to Siri, turn on Listen for “Siri,” and train your voice.
How do I set up “Hey Siri”?
It is the same Listen for “Siri” toggle. When you enable it, Siri walks you through a short voice-training step so it recognizes you.
How do I set up Siri on a Mac?
Go to System Settings > Apple Intelligence & Siri, toggle Siri on, click Enable, and pick a “Listen for” phrase or a keyboard shortcut.
Why won't Siri work after I set it up?
Usually one of four things: an ineligible device, a skipped voice-training step, a blocked microphone, or a language and region mismatch. Work through the Common Mistakes section above.
Do I need Apple Intelligence to use Siri?
No. Classic Siri works on older devices. Apple Intelligence adds the new look and features and needs an eligible device.
How do I use ChatGPT with Siri?
Go to Settings > Apple Intelligence & Siri > Extensions > ChatGPT > Set Up. Keep Confirm ChatGPT Requests on so Siri asks before sending anything off the device.
How do I turn on Type to Siri?
With Apple Intelligence on, double-tap the bottom of the screen after invoking Siri. Without it, use Settings > Accessibility > Siri > Type to Siri.
Try Elephas free on your Mac
The Mac-native, privacy-friendly AI knowledge assistant: on-device Smart Redaction, built-in local LLM models, and the ability to reason over your own notes and PDFs where Siri stops, without your data leaving the device.
Get Elephas →